How to take back up of Outlook Express

In most of cases the users are losing the email stored in Outlook Express when it comes to formtating of the system. And that is also a well known fact that most of the service provider did not wether the user is using the application or not until he is being told to do so. So here I am providing you the simple steps for taking the backup of the mails, addressbook and the configured account in Outlook Express. Pls follow the following simple steps and you will be able to take the back up of the mails. That’s it!!!

In Outlook Express there are three kinds of backups.

1. Mails stored under outlook express.
2. Account configured in outlook express.
3. Address Book.

1. Taking Back of Mails.

Step 1 :Open Out look Express.
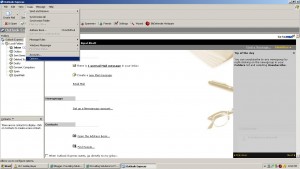
Step 2 : Go to Tools —-> Options.

Step 3 : On doing so one popup will appear. Navigate ot a tab named as “Maintenance”. Under this option you will find an option named as “Store Folder”. Click on that. For reference look the following image.

Step 4 : Copy the entire path shown under the pop up that appear after clicking on Sotre Folder. For reference look the image given below.

Step 5 : Now after copying the path click on Start —> Run. Paste entire path in the text box and then click on OK.

Step 6 : Now after clicking on OK, a new windows will open which will be containing all your mail files(DBX extemsion files.). You need to go up in explorer until you reached to “Idendities” folder.

Step 7 : Now copy the folder of “Idendities” and paste it to a destination folder or to any usb mass storage devices like pen drive. You may even burn out the CD of the same.

After completing above 7 setps you had successfully taken the back up of all the email. For cross varification you can compare the size of both the “Idendities” folder i.e. original one and the backed up one.

Now for the other two back ups you need to follow the below steps. The next step is “How to take the back up of the account configured in Outlook Express?”. This step will help you for after reinstalling the operating system when you need to configure the account in outlook express then it becomes a little tidy to job to inquire about the pop3 and smtp address, username and password of the account to customer. This back up will make you free from the tidy job as to configure the same account into the system all you need to do is to improt the account backup and that’s it. So follow the below steps and forgot the worries….

2. Taking Back Up of Account Configured in Outlook Express.

Step 1 : Open Outlook Express.

Step 2 : Go To : Tools –> Account. On doing so you will find the window shown in the below image.

Step 3 : Now as per the image you will find various account configured in Outlook Express. It might be possible that you might not find the default configured accounts of Outlook Express in case if the user might have removed them from the application. In that case you will find only the personlized account which might be configuerd in the outlook express. In this illustration it is highlited wiht red border and its “mail.ssindia.co.in”. Now you need to select the desired account that you need to take back up of and just click on export. Then you will find a pop up windows which will ask you for saving the file.(The extention of the account back up file will be *.iaf in case of Outlook Express.) Select the desired destination for saving the file. Moslty it should be a place other than the C Drive and the folder in which you might have stored the Idendities folder which was shown in the previous method. For reference look at the following images.

Now what you need to do is to click on Save button and that’s it. The Account is taken back up. But here I would like to bring to your notice that in rare cases the file may say its a corrupted file while you use it restore. So to have a safe side I request you people to note down the POP3 and SMTP values from properties of the account. This is a very rare posibilites that you will get the error. But you can never say its all about windows……. (joking!!!).

Now we will move forward to the third and final step. In some cases the engineers forget to take the back up of the address book which might be very painful if it contains a big no. of contacts. So here is the final step to take the back up of Address Book.

3. Taking Back Up of Address Book.

Step 1 : Open Outlook Express.

Step 2 : Just click on Addresses icon on the primary toolbar of Outlook Express which will open the Address Book in individual window.

Step 3 : Now Go To File –> Export –> Address Book (wab). Then give the desired name for the address book and select the destination folder. (Its a general practise that you give the name as “addressbook” and save it in the same folder where you had taken back up of Idendities and Account. And that’s it. Its over….. You have successfully taken the back up of Outlook Express.

The final folder where you have stored all the back ups should looked like the below image.

If any of you viewer find this article helpful or you have found it wrong then please put up your valuable comments in order to help me serve you better.

How to Remove Total Secure 2009?

This was the first time I have faced any spyware/roughware related problem in Microsoft Windows Vista. The problem was like as soon as I open the Internet Explorer windows it goes to the website of IE Antivirus and shows that my computer is getting scanned. After the scanning completes it shows your computer is infected by a spyware. Along with this an icon appears in System Tray of the machine showing the bubble message that “Your Computer is infected! Windows will download the best AntiSpyware and Try to remove the spyware.”
Finally I got rid of this problem. It was possible after using the following steps. I have used various web references for the same. Most of the reviews match the following.
  1. You can download an Anti Malware Tool named as “Malwarebyte’s Anti Malware”. I got it downloaded from the website of the bleepingcomputers. The link provided over that site is as follows. (This link is provided from the website of http://www.bleepingcomputer.com/.
    Malwarebytes’ Anti-Malware Download Link
  2. Install the software using the downlaoded file. As soon as the installation completes, update the software. Then perform a Smart System Scan using the software.
  3. After the scanning complete it will show the list of the infected items. Select all the infected items and click on Remove Selected items.
  4. Restart the computer. And hopefully the problem should be resolved.

My Documents Opens automatically when Computer Starts

This is a kind of problem that the users are facing now a days the most. The problem after the system is infected with some kind of virus the My Document folder. So we are forced to find out some solution. So here it is. This is the game of Registry. Start playing game following the given rules :

Some virus while infecting the computer changes the registry value of the Userinit and PersistBrowsers in the registry which causes this problem. So to resolve the issue you need to set the values to the original.

  1. Click Start, click Run, type regedit in the Open box, and then click OK.
  2. Locate and then click the following registry subkey:HKEY_LOCAL_MACHINESOFTWAREMicrosoft
    WindowsNTCurrentVersionWinlogon
  3. In the right pane, right-click Userinit, and then click Modify.
  4. In the Edit String dialog box, type Windows installation drive letter:WINDOWSsystem32userinit.exe under Value data, and then click OK.
  5. Locate and then click the following registry sub key:
  6. HKEY_CURRENT_USERSoftwareMicrosoftWindows
  7. CurrentVersionExplorerAdvanced
    In the right pane, right-click PersistBrowsers, and then click Modify.
  8. In the Edit DWORD Value dialog box, type 0 under Value data, and then click OK.
  9. Quit Registry Editor, and then restart the computer.

Note : Kindly export the registry before making any changes to it so that in case if it doesn’t work you can restore them later on.

Computer Automatically Logs off as soon as it shows Desktop !!!

Due to the various kinds of Virus Attacks the userinit.exe files gets corrupted or various Antivirus deletes/quarantine the file. And as the result of the same the computer logs off automatically as soon as you start the computer. This is the problem faced now a days by most of the user. So what you need to do is you need to copy the file “userinit.exe” file from some other sources to the “C:/windows/system32” folder. More often the back up of the same file lies in “C:/windows/system32/drivercache” folder. So you can boot up the system using some “Windows Live” or “Third party Boot CD” kind of utilities and copy the file from the DRIVERCACHE folder to SYSTEM32 Folder.

That might be the case that you may not find the file within the infected system then in that case you can copy the file from another working system to the destination folder that is “C:/windows/system32”. This is the solution that worked for me. So I hope it may also work for you. If did not work then you can always put up your comment to the blog so that I can even improve my blog providing other solution to the kind of typical problem.

Task Manager is Disabled or not working !!!

To open the Task Manager, you normally would do one of the following:

# Press CTRL-ALT-DEL on the keyboard
# Press CTRL-SHIFT-ESC on the keyboard
# Right-click on a blank area on the start bar and choose Task Manager
# Click on Start, Run and type TASKMGR in the run box and press Enter

Sometimes instead of Task Manager opening you’ll see the following screen. In these cases, you’ll have to follow the methods below to re-enable access to the Task Manager.

Here we are providing all the possible methods that we know for the same. Please find the details below :

First we’ll begin with the various registry modification methods for correcting this problem.

Method 1 – Using the Group Policy Editor in Windows XP Professional

1. Click Start, Run, type gpedit.msc and click OK.
2. Under User Configuration, Click on the plus (+) next to Administrative Templates
3. Click on the plus (+) next tSystem, then click on Ctrl+Alt+Delete Options
4. Find Remove Task Manager in the right-hand pane and double click on it
5. Choose the option “Not Configured” and click Ok.
6. Close the Group Policy Window

Method 2: Change the Task Manager Option through the Run line

1. Click on Start, Run and type the following command exactly and press Enter
2. REG add HKCUSoftwareMicrosoftWindowsCurrentVersionPoliciesSystem /v DisableTaskMgr /t REG_DWORD /d 0 /f

Method 3: Change Task Manager through a Registry REG file

1.Click on Start, Run, and type Notepad and press Enter
2. Copy and paste the information between the dotted lines into Notepad and save it to your desktop as taskmanager.reg
————————————
Windows Registry Editor Version 5.00

[HKEY_CURRENT_USERSoftwareMicrosoftWindowsCurrentVersionPoliciesSystem]
“DisableTaskMgr”=dword:00000000
————————————-

3. Double click on the taskmanager.reg file to enter the information into the Windows registry

Method 4: Delete the restriction in the registry manually

1. Click on Start, Run, and type REGEDIT and press Enter
2. Navigate to the following branch

HKEY_CURRENT_USER Software Microsoft Windows CurrentVersion Policies System

3. In the right pane, find and delete the value named DisableTaskMgr

So as of our knowledge any of the above method will help you out to solve the entire issue of Task Manager Disabled.

Keep in Touch !!!!

In case of any other query you can mail us on itsolutionbrd@blogspot.com

Thanks

Problem Accessing Local Area Network (LAN)

It’s a well known fact that now a days the virus infection has been increased by a large volume which has created a big problem for the IT service providers. Most of the viruses have started creating their own executable files with random file names in system folder or temp folder. And as the result of the same they can control various kinds of the services and they even changes the registry values.

For example we can take the case of the win32.kido@worm virus which straight away create problem regarding the networking. And the users will not be able to access the network. I had also been facing the same problem a week or ten days back. I was so frustrated at that time. I tried out a number of solution.

Finally I have got some commands which will restart the network related services. I tried out the commands and found the fruitful result. I wish these command may also work for you people. You can execute the commands using the following steps.

Restarting Network Services :

Step 1 : Go To Start —> Run.

Step 2 : Type in “cmd” in the appeared text box. On doing so you will be able to find the black screen of Dos Prompt with the moving cursor.

Step 3 : Go to the root drive letter (You can even use “cd..” to step down the directory stepwise or you can even use “cd” command to directly navigate to the root drive letter.

Step 4 : On the screen you will be looking at

c:>_

Step 5 : Now Type down the following commands in turn as shown below :

c:>netsh int ip reset reset.txt

c:>netsh winsock reset. (After performing this command will ask you to

restart the services. But it is not required at

this stage.)

c:>netsh firewall reset.

Step 6 : After giving the above three commands in steps you can close the dos prompt and then restart your pc.

In order to simplify the above steps our experts have done a great job. They have designed a small batch file which will carry all above steps automatically if you run and download the following file. You just need to download the file to desktop. Unzip the content and run it.

netwrok.zip

After running the above batch file or after taking the above six steps manually the job is almost done. But there is one more possibility that after doing so you might not be able to ping the other machines on the network in that case you need to “Turn of the Windows Firewall”. In order to do so please follow the given steps below.

Turn of Windows Firewall :

Step 1 : Go To : Start –> Run.

Step 2 : Type in “firewall.cpl” in the text box and press OK. On doing so you will be able to see the windows firewall settings. You just need to select on “Off (Not recommended”). And you have successfully turn off the windows firewall.

Now hopefully you should get out of the network related problem as it worked for me.

I hope this article might have worked for you. Please leave your comment in any case if it worked for you or it didn’t work for you. It will help me better providing other viable solutions.